
Brakes
Task: Inspect and Service Brakes
Loosen all wheel nuts, put up on jack stands. Removed Front Drums and one at time remove springs, brake shoes and wheel cylinder parts.
Inspected wheel cylinders, They were like new so I just honed them out. I cleaned them out with brake cleaner and rebuild with new wheel cylinder kits making sure all parts were in the right order. Checked Bleeder screw to ensure it can be loosen off in prep for Bleeding.
Checked Brake shoes and found them to be thick and in good condition. Painted the backing plate and metal portion of Brake shoes.
Replaced any rusted or worn springs, guide pins or retainer clips. Checked Brake drums and found them to be in good condition. cleaned, painted and reinstalled them.
Task: Inspect & Replace Brake Lines
Check all Brake lines and any sign of rust or kinks then they were replaced. I replaced all brake lines
Task: Service and Install Master Cylinder
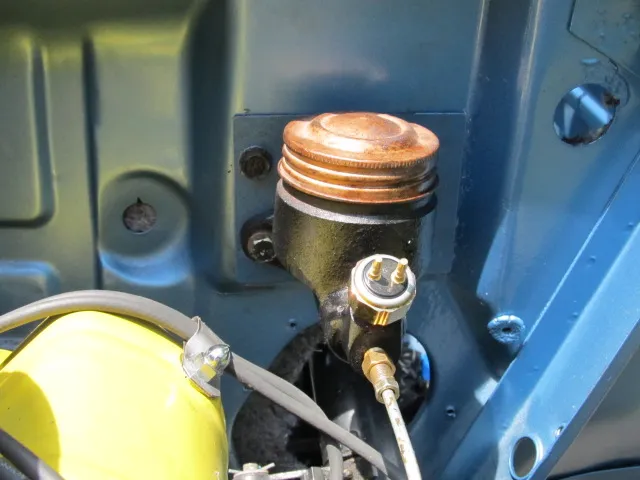
Installed Master cylinder and suspended Pedal assembly*
*This procedure is for 1963-64 models only
Install new or reconditioned Master Cylinder on firewall using re-enforcement bracket *. Secure 4 bolts with washers to suspended pedal assembly on the inside. Ensure that the Brake pedal rod is lubricated & inserted into the master cylinder before tighten all bolts. Bottom bolts need to be slightly longer to accommodate the re-enforcement bracket. Master Cylinder should be primed prior to installation to help with proper operation & bleeding of the brakes
* This Re-enforcement bracket is cut from 16 gauge metal and put between firewall and master cylinder as in above photo. If not installed expect cracks to develop from repeated movement of suspended brake pedals of the 1963-64 Champs
Task: Bleed Brake Lines
You will need - 1/4 in box end wrench, 1/4 in bleeder hose (long enough to rear the bottom of your clear jar) and a clear jar along with sufficient Dot 3 Brake fluid.
Normally a two person job especially if you don’t have a Brake bleeder Kit which allows one person to bleed the brakes.
Top the master cylinder up and put cover on loosely so the brake fuel doesn’t get on the engine components. Start at the far rear brake drum and with the proper size clear hose attach it to the rear bleeder screw with the other end in a clear glass jar with some brake fluid in it to help ensure no air gets back into the brake system. While your helper is pumping the brake open up the Bleeder screw and when the brake fluid is coming out in a even flow and no air bubbles are present then shut it off. Ensure you always keep the Master Cylinder full to ensure you don’t reintroduce any air into the brake lines. You should fully close the bleeder screw at the same time your helper is pushing the brake pedal to the floor. Go to the other rear brake drum and do the same procedure.
Go to the front brake drum farthest from the master cylinder and the finally the one closest to the master cylinder ensuring the flow of brake fluid has no air bubbles. If done properly you should have a firm brake pedal that doesn’t bottom out. Top up the master cylinder and test you brakes to ensure the all work properly. If you have to pump the brakes two or 3 times to get them to work right then you will need to bleed your brake system again as you still have air in the lines.